Dolphin Configuration Guide
This tutorial was written using an i7 6700hq, Nvidia gtx 1070 with 16gb of ram as a reference computer for configuration. Some of the settings shown may not be appropriate for other computers. Do not just copy the configuration shown in screenshots, apply some critical thinking to your own choices.
Ubershaders and the Current State of Dolphin
Dolphin is relatively easy to setup compared to many other emulators, the basic setup for a configuration that will run most games only takes a handful of changes from the default settings. Depending on your hardware though some tweaks may be necessary, and with new but important features just implemented into Dolphin some settings can be somewhat of an unknown until you test slight differences to find what works best. Still, because of the complexity of the Gamecube and Wii compared to older (especially 2d) consoles a one size fits all configuration will still often need individual game tweaks. This guide will mostly only cover a basic setup though without going into too many single game tweaks.
The biggest new feature that makes a large difference on different hardware and in different games is the release of ubershaders. This small tutorial is not nearly long or detailed enough to explain ubershaders fully but here is a very basic explanation along with the reason they exist.
Before the very recent builds of Dolphin, emulation even on very high end computers would have occasional stuttering, especially when first playing a game. In short, this is because a real Gamecube or Wii was designed to expect graphics shaders to be instantly delivered for the game to use. A shader in this context is essentially a program that the GC or Wii’s GPU would execute in sync with the rest of the game being executed by the CPU. GC games were designed with the expectation that they will only ever run on one specific type of hardware (the console) and so there wouldn’t need to be any differences between shaders when run on one GC or another.
This is not how modern computers do things.
For each game, each computer, each configuration, Dolphin would need to compile those shaders again. This takes time instead of being instantaneous on original hardware. If the rest of the CPU being emulated and the shader compilation become out of sync (which they will) then the game will stutter until the shaders are compiled. A Dolphin fork, Ishiiruka, worked around this by just allowing them to go out of sync, reducing stuttering but causing objects that loaded late to randomly “pop” in later than they should. Some games would be so out of sync that they would only be borderline playable at best (All the Metroid Prime games are the most noticeable instance of this.)
This is important because as of July 30th a completely new
way of handling shaders was implemented into Dolphin’s dev builds that
drastically improves stuttering and performance, but requires many changes in
configuration. To explain it in the shortest way possible, Dolphin can now
emulate the GC/Wii’s GPU rendering pipeline on the host machine’s GPU itself.
This is what’s called the “ubershader”. Dolphin can run in a hybrid
mode (emulating the rendering pipeline while also using the
traditional, yet asynchronous way to handle shaders) or exclusive
mode (only emulating the rendering pipeline.)
For the sake of not rambling on for another 500 words, many technical details of ubershaders are going to be skipped. But, the important things to know are; ubershaders are bleeding edge new so many configurations have not been tested, ubershaders are a huge improvement over the old methods, there are still some bugs and known issues that will probably be fixed soon, and that because of this setup and configuration of Dolphin has changed a little.
Before Installation
Usually, emulation of any console is tied much more heavily to the host computer’s processor than the graphics card. This is true of Dolphin, but not as true as it was a week ago. Ubershader emulation is handled by the graphics card, and so a decent graphics card is important. But just as important, you must now make sure your graphics card drivers are up to date! Even the latest nvidia drivers have some bugs that currently cause problems. Out of date (or even worse, default Windows drivers not from the manufacturer) will just cause unpredictable problems and likely terrible performance compared to newer drivers. This is much more important now for Dolphin than it ever has been for almost any other mainstream emulator.
Nvidia‘s current driver (as of this post) is 384.94. Download it from Nvidia here.
AMD‘s drivers, I don’t know how AMD numbers their versions, but either way get them from AMD here.
Intel‘s current driver for Intel integrated GPUs is 15.46.02.4729, download it from Intel here.
Download and Install the Latest Dev Build of Dolphin
Dolphin very rarely releases “stable” builds. It’s pretty much expected that the dev builds are what should be used in almost every case. Dev builds are released sometimes multiple times in one day. In less than 12 hours the build I began writing this for (5.0-4889) has been surpassed by 3 new builds with the latest being 5.0-4906. It’s overkill to update to every new build, but it’s a good thing to check out every couple weeks or so. Because ubershaders are only in very new builds though, now is a good time to make sure you’re using a relatively current build.
Download the latest developer build (Skip past the “stable versions”!) from the Dolphin website here. I am going to assume you know how to extract and install the emulator itself.
Configuring Dolphin
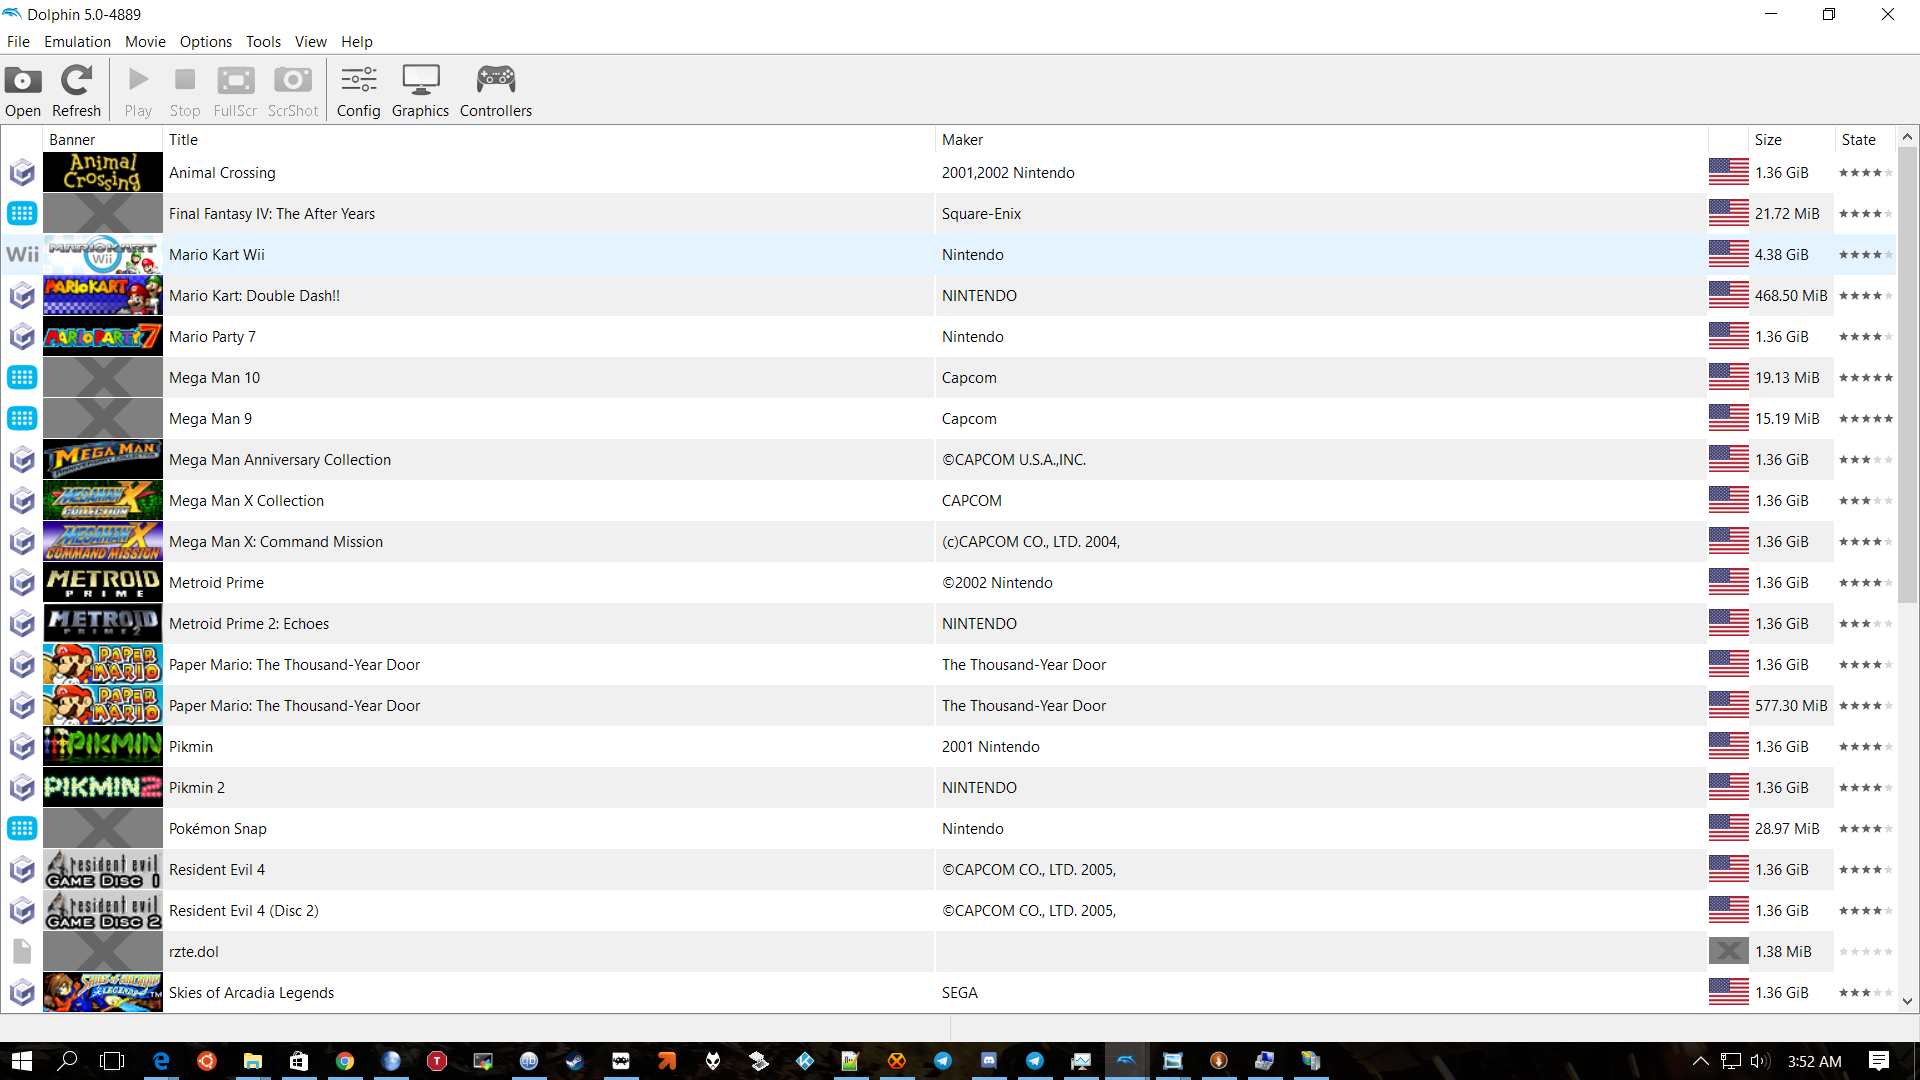
The main Dolphin window should look something like this, except a new install
that hasn’t been configured will not list any games the way mine does. You can
see at the time there are buttons for “Config” “Graphics”
and “Controllers”. These three buttons will take us to the three most
important windows to configure the emulator. There is also an
“Options” tab at the very top in between “Movie” and
“Tools” that will get us to the same places.
Dolphin Configuration
Dolphin Configuration – General
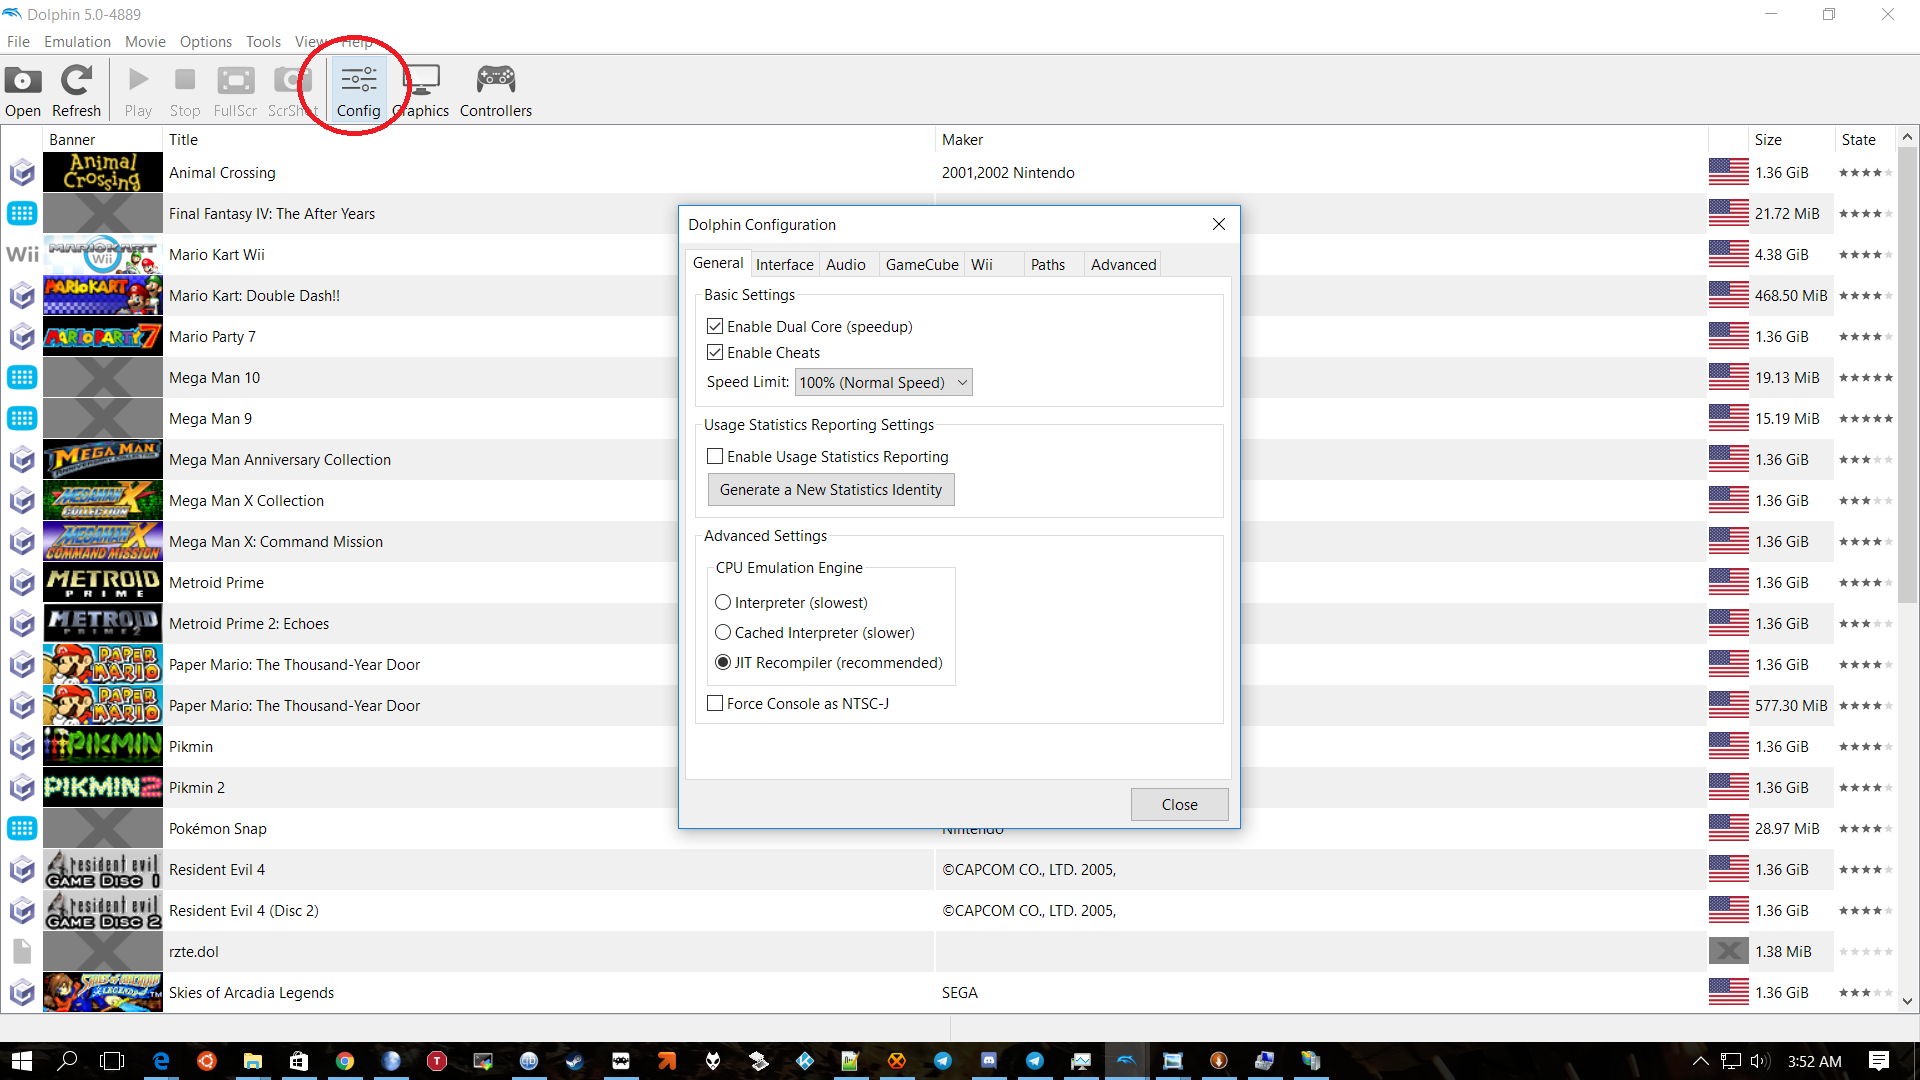
Pressing the “Config” Button will bring us to this general window.
As a note before we get any further, we will be straight up skipping some of the tabs in this window. There is really no reason to change them from the default for 99% of people in 99% of circumstances.
Here though, we want to make sure that we enable the check box for Enable Cheats. This can be important regardless of whether you want to actually “cheat”, because many “cheats” used for some games aren’t actually cheats. They’re more like specific hacks to improve compatibility or enable things like widescreen support, among many other things.
Otherwise the defaults here should be fine. Dual Core should be Enabled. The Speed Limit should be 100% (there are a few cases you might mess with this if you’re using 60fps hacks for example, but not often. It can break games more often than not.) And the CPU Emulation Engine absolutely must be set to JIT Recompiler for anything other than debugging or hacking.
We’re going to skip the Interface, Audio, GameCube, and Wii tabs. Audio should be fine with all the defaults (DSP HLE emulation, Audio Backen: XAudio2, and unless you can’t keep emulation at 30fps Enable Audio Stretching should be off.) And the other 3 tabs are pretty self explanatory and rarely need to be messed with anyway.
Dolphin Configuration – Paths
All we need to do here is add the directories where our GC and Wii isos are located. Dolphin will refresh this list every time it’s loaded and will show us the easy to manage list of games like you could see in the first picture of Dolphin in this article.
Simply hit Add, find a directory and hit select folder. Not much to it. The only other option that may be useful is SD Card Path for some Wii emulation, but that’s not all that important most of the time.
Dolphin Configuration – Advanced
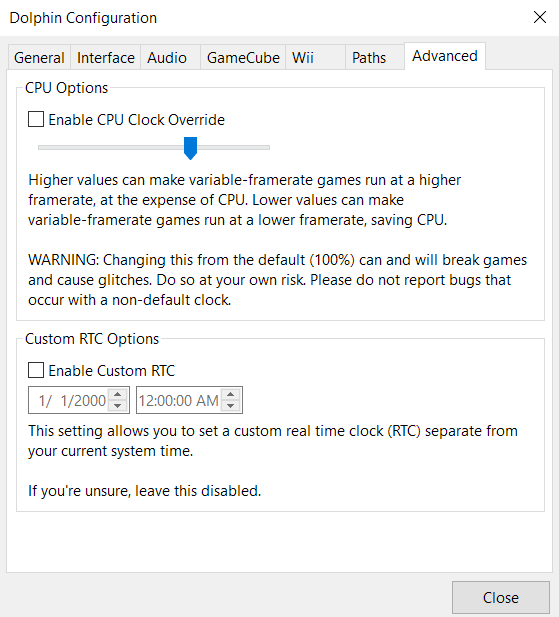
Nothing but dragons here. Don’t mess with either of these options unless you know specifically why you are changing anything. The CPU Clock Override will break most games at best. I have only used it once when trying to get the virtual console Zelda 64 running at a higher framerate than it was originally designed to run at (even on actual Nintendo hardware it maxes out at like 20fps, not great.) Even when I managed to get it running at a higher framerate without just being sped up by altering the clock override (among other things) the game was still broken. Custom RTC Options lets you change the emulated systems clock though, if you want to cheat at Animal Crossing or something along those lines.
Graphics Configuration
Graphics Configuration – General
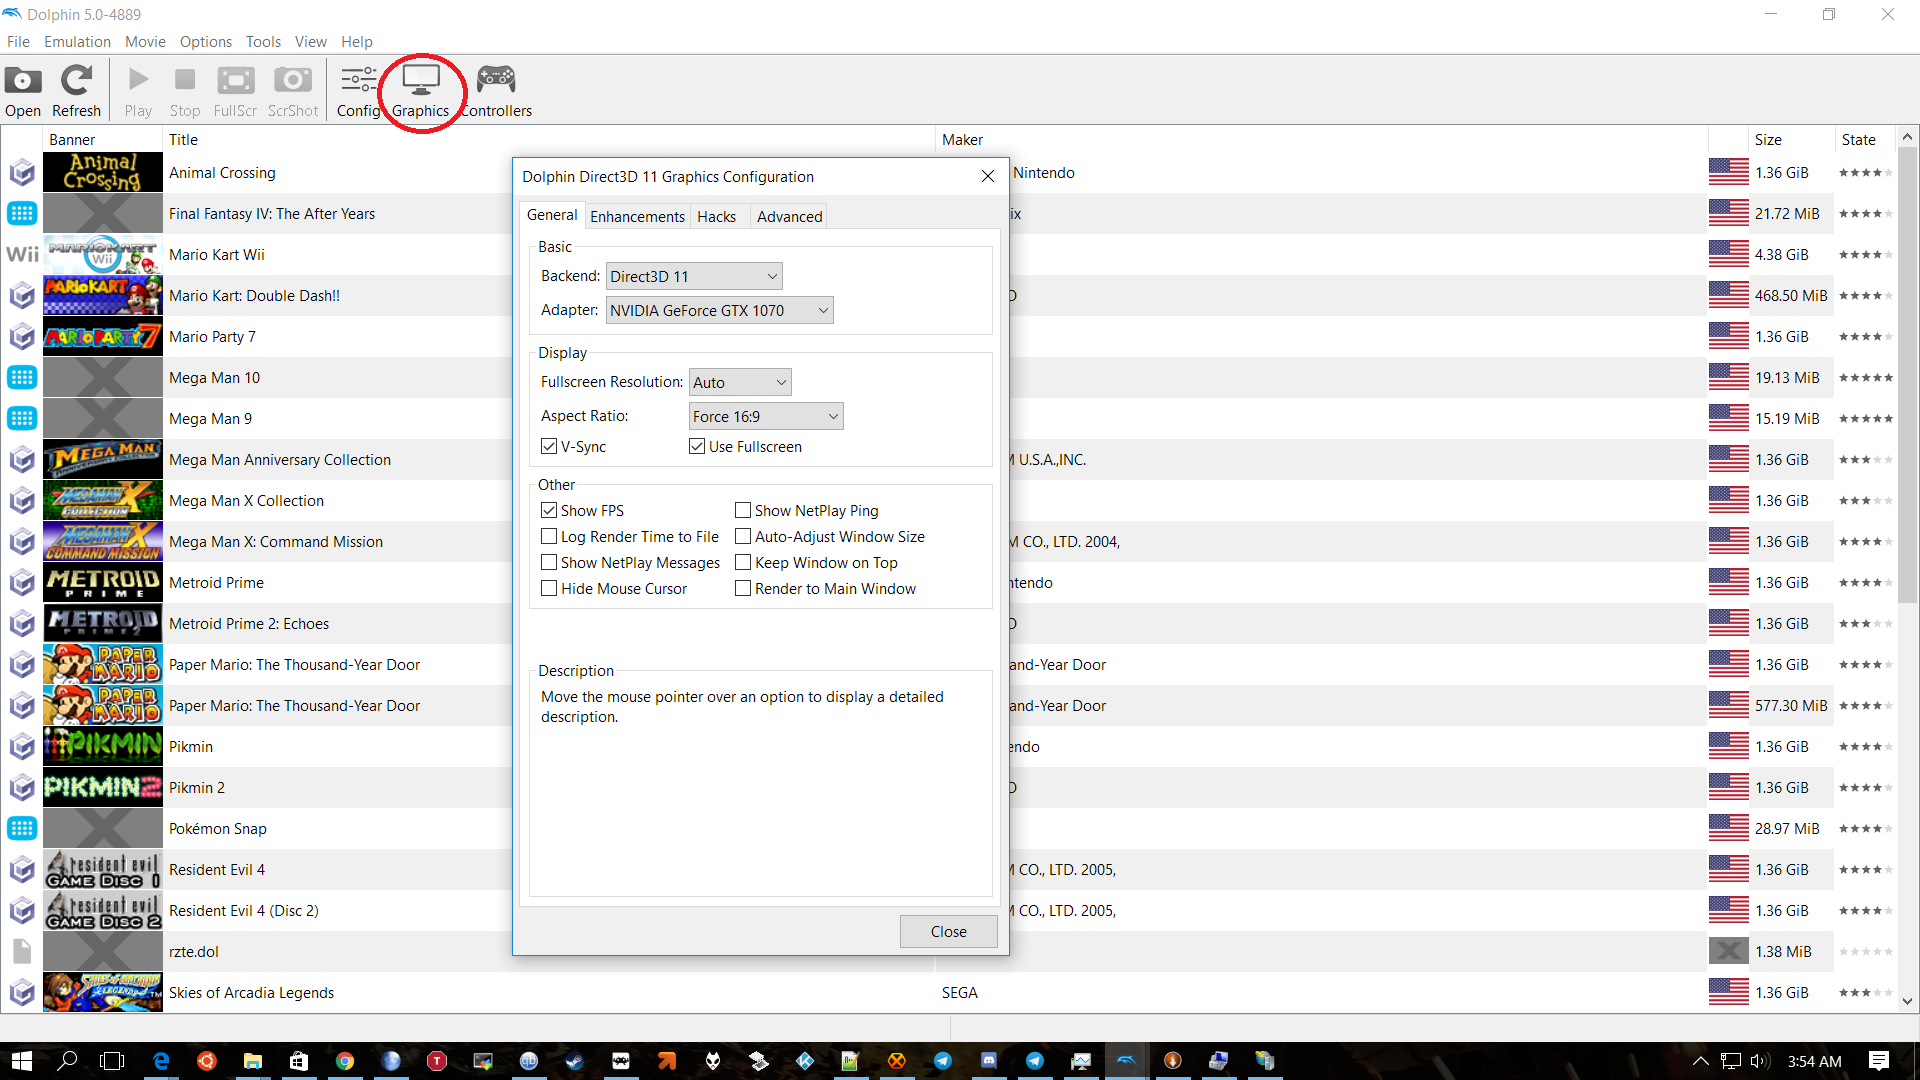
Here, the graphics configuration, is where our decisions have a serious impact on performance. These are the settings where some gradual tweaking may be necessary to find out what’s best for your own computer. Things are not as complex as they look though, many of the settings are still only useful for debugging or for extreme edge cases where only one or a couple games require certain settings, or settings with a negligible impact on performance.
The first setting here is very important, but you will likely find what’s right for you very quickly and easily. The Backend, on most modern PCs running Windows you will choose either Direct3D 11 or OpenGL. Vulkan is still very new, someday it may be the preferred backend but right now it isn’t a practical choice. Software Renderer is extremely slow, it’s another option that’s only there for testing.
For me personally Direct3D 11 seems to work the best in most cases. But that may be specific to my hardware (especially GPU). I use a Nvidia gtx 1070, if you have a similar graphics card there is a good chance that may work best for you. Still, OpenGL also works generally fine for me. Just try both of those two and see which seems better for you.
Adapter should be set to your main graphics card. If it’s not, then change it. I think that may only be an issue on laptops with both an integrated GPU and a higher performance GPU like in Nvidia Optimus setups. I don’t have a computer like that to test it on, and for me it has always chosen the correct (and only) GPU I have by default.
Fullscreen Resolution, what you set this too depends on what the native resolution of your monitor is and also our selection for another option in the “Enhancements” tab we will deal with later. The native resolution for a Wii maxes out around 640×456, but most modern computers can easily force the games to be drawn at a much higher resolution, drastically improving the graphics quality over the original hardware. Changing the Fullscreen Resolution in the General tab will NOT effect the internal resolution the games are drawn at though, so set it to whatever you usually have your display set to or just leave it at auto if it doesn’t cause any problems for you (it probably wont). When we change the internal resolution later though, you will want to make sure this setting is higher than your internal resolution setting (it very likely will be.)
The Aspect Ratio setting configures whether you will have the game running in widescreen (16:9) or in the more almost-square-shape that most TVs were back when the Gamecube was current (4:3). Or, if you want to make sure the game fills your screen no matter what, even if you have an exotic shape monitor, you can tell it to “Stretch to Window”. Stretch to Window could end up displaying some odd results though.
Whether you use 16:9 Widescreen or Standard 4:3 is mostly a matter of preference these days. Practically any monitor made in the past handful of years will be 16:9 or something close. Since the games were originally designed for 4:3 and often could not display in widescreen some people prefer to leave it set to 4:3, but then you will end up with black bars on the side of your monitor. If you force 16:9 the game may end up looking stretched out. However, most games though can either use Dolphins built in “Widescreen hack” or a custom Widescreen hack (through the cheat engine we enabled earlier) to take advantage of a larger field of view. In my experience the gameplay expands to 16:9 very easily in most games, however the HUD doesn’t. So, for example, you can play Wind Waker in 16:9 but the bar showing how many hearts you have, your magic, the map and your equipped items will be floating closer to the center of the screen (where it would be on a 4:3 display) instead of moved out onto the left and right edges of the screen.
Mine is set to 16:9, that’s just what I personally like. It’s not the most “authentic” or “true to the original game” but I just prefer it. I also use heavy shaders in 2d games, a mortal sin to many retro gamers, so take my opinion with a grain of salt and choose what looks best for you. It won’t effect performance in any noticeable way.
V-Sync stands for “Vertical Synchronization”. It’s a common option in most games, not just emulators. Basically, V-Sync allows the emulator to draw each frame of the game at a rate that matches the actual refresh rate of your monitor. This makes the gameplay appear smoother and greatly reduces screen tearing. It does generally lower performance though and can cause a little bit more input delay than there would be with it off. Unless you are seriously struggling to run games at full speed I personally would leave it on. The performance cost isn’t that much, the benefits are very noticeable and the tiny increase in input delay will only matter in the twitchiest of games. If having V-Sync on or off is the difference between “playable” and “unplayable” for you, then your computer has a serious bottleneck somewhere else that you should look into first.
Use Fullscreen is exactly what it says. One of the more self explanatory options.
Most of the options under “Other” we will rarely if every have to touch. Either that or they also explain themselves.
“Show FPS” of course will show the framerate you’re getting in game. I turn this on, especially when testing out new configurations. But remember, most GC and Wii games max out at 30fps by design. Don’t be surprised when you never hit 60. If your games are stable at 30 then that means you’re getting “full speed”. Some games have solid hacks though (again, you would input them through the cheat engine) that allow them to run at 60fps, but many games just break in strange ways if you do this. Show NetPlay Ping can be useful if you’re, well, doing any netplay. There’s nothing else worth really explaining here though, nothing that will effect your performance at least.
Graphics Configuration – Enhancements
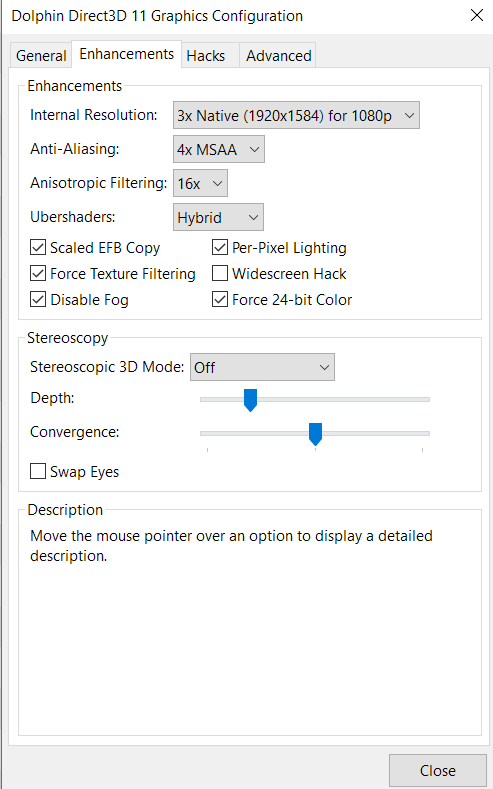
Internal Resolution is probably the single most important option for improving the graphic quality of GC/WII games. Leaving this setting to either “auto” options is a bad idea, you want control over this. Setting it to “Native (640×528)” will render the games as they were on the original console. Most mid-range and higher computers can handle higher than native resolution though.
Here’s the difference between “Internal Resolution”, our “Fullscreen Resolution” setting over in the general tab and simply upscaling the graphics to a higher resolution in most emulators for 2d systems. Our Fullscreen Resolution is basically just what our screen is drawn at but not the game really. That is, if we have the Fullscreen Resolution set to 1920×1080 (that’s 1080p) but Internal Resolution set to Native 640×528, it will still only “look” 640×528. Each emulated pixel will really just be drawn as 4 or however many pixels on our display. This is usually the case with emulating 2d systems at higher resolutions too (without filters, filters change everything.) An NES for example emulated at 1920×1080 will still look just as blocky as on an old CRT TV back in the 80s. You cant just add detail to already drawn pixels no matter what your display is outputting at.
But just like with actual 3d PC games, we can make the GC/Wii emulation draw the game’s models in much higher detail. That is what this setting does. A higher internal resolution vastly improved image quality. Increasing the internal resolution puts more strain on the graphics card, but since emulation is almost entire CPU bound you usually have more than enough room to play with a higher internal resolution. The CPU is bottlenecking the emulation so much that the GPU, relatively, has very little work to do. I use 3x because that is the maximum that’s going to make a difference on a 1080p display. If you have a 4k or more display you can experiment with even higher settings. However, the CPU is not as much of a bottleneck as it once was thanks to Ubershaders, so with ubershaders enabled you may have less to work with if you have a weak GPU.
Anti-Aliasing is a common feature in games that smooths out jagged edges. It’s the reason n64 games looked less blocky when compared to playstation games but a little fuzzier. This is taxing on the GPU, not the CPU. So again, how good your graphics card is determines how high you can set this too.
Very high anti-aliasing is just a waste of resources at “lower” resolutions. I can pull off 8x antialiasing just fine, but since I play at 1080p I stick with 4x simply because there is no real difference between 8x and 4x at that resolution.
The differences between MSAA anti-aliasing and SSAA anti-aliasing are worth googling. They are different techniques with different results but to explain it would require too much for this tutorial. As of right now though, with the way ubershaders are implemented MSAA ends up not taxing the GPU any more than without ubershaders. SSAA on the other hand has a very negative impact on performance. It is incredibly costly on the GPU. This may change in the future but for now SSAA should be avoided.
Anisotropic Filtering improves texture quality. It is another common feature of 3d applications that is too complex for this tutorial. I have never noticed any performance difference regardless of what this is set at. To make sure that wasn’t just because of my higher end GPU I asked several Dolphin developers about this feature. According to them; “Anisotropic filtering is not a bottleneck in Dolphin. You can set it to 16x on integrated gpus without noticing much of a performance impact.” It works fine when used with ubershaders too. So this should be set at 16x for maximum texture quality unless you are seriously struggling to reach playable performance. It can potentially cause some graphic glitching at very high resolutions though, but they would probably be minor. If you play at very high resolutions and notice too many glitches then feel free to lower/turn this off.
Ubershaders. This is the big, new incredible feature that’s been touched on throughout the tutorial. If you have even a somewhat modern GPU you should have this set to either Hybrid or Exclusive. The Dolphin developers have explicitly stated that they are working towards making ubershaders perform well on even integrated GPUs, although this early in their release there might still be performance problems with integrated or very weak graphics cards.
Otherwise, it’s hard to say exactly what it should be set to in most cases as there are still so many unknowns, untested configurations and undiscovered bugs. I would lean towards using Hybrid for most setups even with fast GPUs. Exclusive has a generally higher chance of reacting poorly with other settings and lowering performance/overtaxing the GPU. This will all probably change in later builds.
Although, the current NVidia driver may have problems with hybrid mode. Hybrid uses a second thread to compile shaders in the background, so it can draw using the ‘slow’ ubershader until the faster one has finishing compiling, but in some cases the nvidia driver blocks the main drawing when it’s doing the shader compile in the second thread. This can possibly cause stuttering. It’s not yet certain whether this only effects the OpenGL backend, so again the best option is to test both choices on your own hardware. On my hardware I haven’t actually run into any noticeable differences between hybrid and exclusive.
Scaled EFB Copy should almost always be left on. Per-Pixel Lighting improves quality and had very little performance impact with the old shader system. With ubershaders however, Per-Pixel Lighting can cause a noticeable performance impact. If you have trouble maintaining 30fps in some taxing games it is worth turning this off and seeing if your performance improves.
Force Texture Filtering can improve texture quality but it has been known to cause some graphical glitches in other games. I haven’t encountered any problems because of it in Dolphin builds from the past year or even longer, but it is fine to leave off anyway if you choose to be cautious. It makes little difference either way.
Widescreen hack is usually best left off. It can help some games work properly in forced 16:9 aspect ratio but very rarely does it do a good job. Most games that need some kind of widescreen hack have their own individual hacks that can be implemented through the cheat engine.
Fog is the well known effect used in many older games to limit the distance that can be seen in the game. It was a common way to reduce the performance cost of n64 era games. Disabling it increases the draw distance of many games but if the game actually uses fog for any important reason then disabling it may cause issues. Whether to disable fog or leave it as is is up to you. It’s personal preference for the most part.
Force 24-bit Color improves color quality and doesn’t negatively impact performance. It should almost always be checked.
The Stereoscopy settings have nothing to do with normal gameplay. If you have a 3D TV or a VR headset like the Oculus Rift or HTC Vive then these settings are worth looking into. For this tutorial I will leave it at that.
Graphics Configuration – Hacks
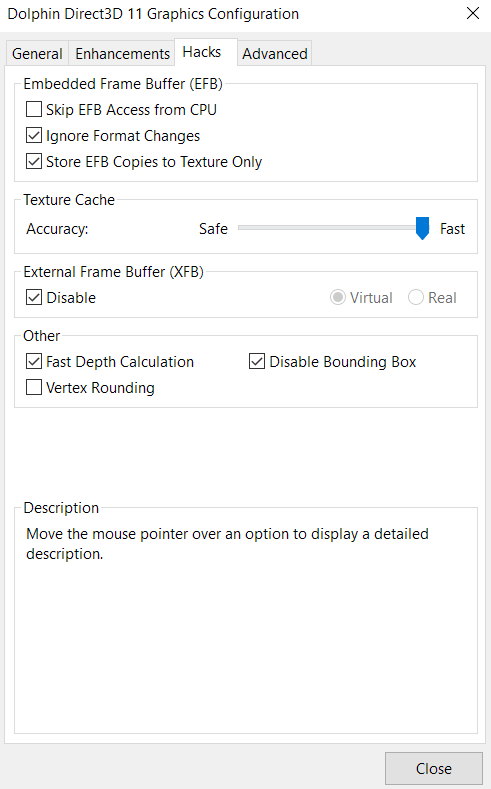
We don’t need to change much here. The only thing worth mentioning is Texture Cache Accuracy. A handful of games will sometimes get broken, glitched text on some hardware. This is rare and when it does occur it is usually minor. If it ends up being a serious problem it can often be fixed by moving the Texture Cache Accuracy slider closer towards safe. Otherwise having it entirely towards Fast is best.
Graphics Configuration – Advanced
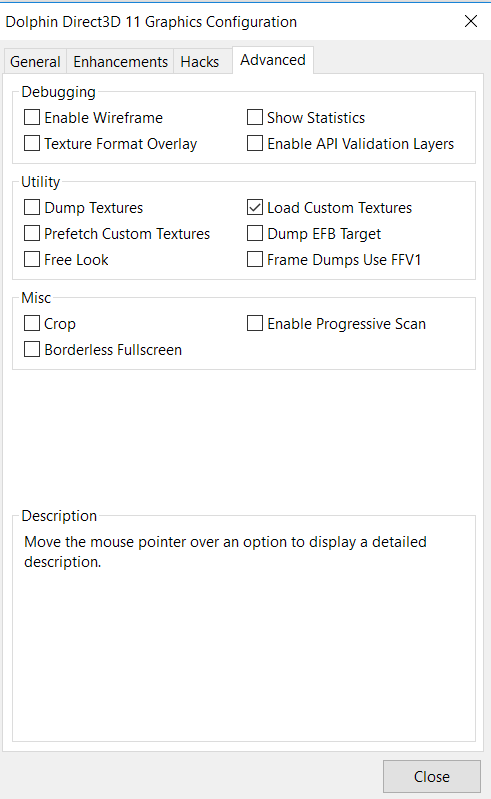
Most of these options have no impact on performance and have only novel or debugging purposes. Load Custom Textures is an option worth looking into though. Often popular games have multiple replacement texture packs created by the community that push the texture quality way beyond what the original console could handle. Combined with higher internal resolutions the games can look better than officially released HD remakes.
For example, Hypatia’s texture pack for the Virtual Console Mario 64 completely changes the art style of the game. Her Wind Waker texture pack is arguably better looking than the official WiiU HD port. Installing texture packs requires putting the right files in the right folders outside the emulator, it can be a little tricky and is outside the scope of this guide.
Controllers
Dolphin Controller Configuration
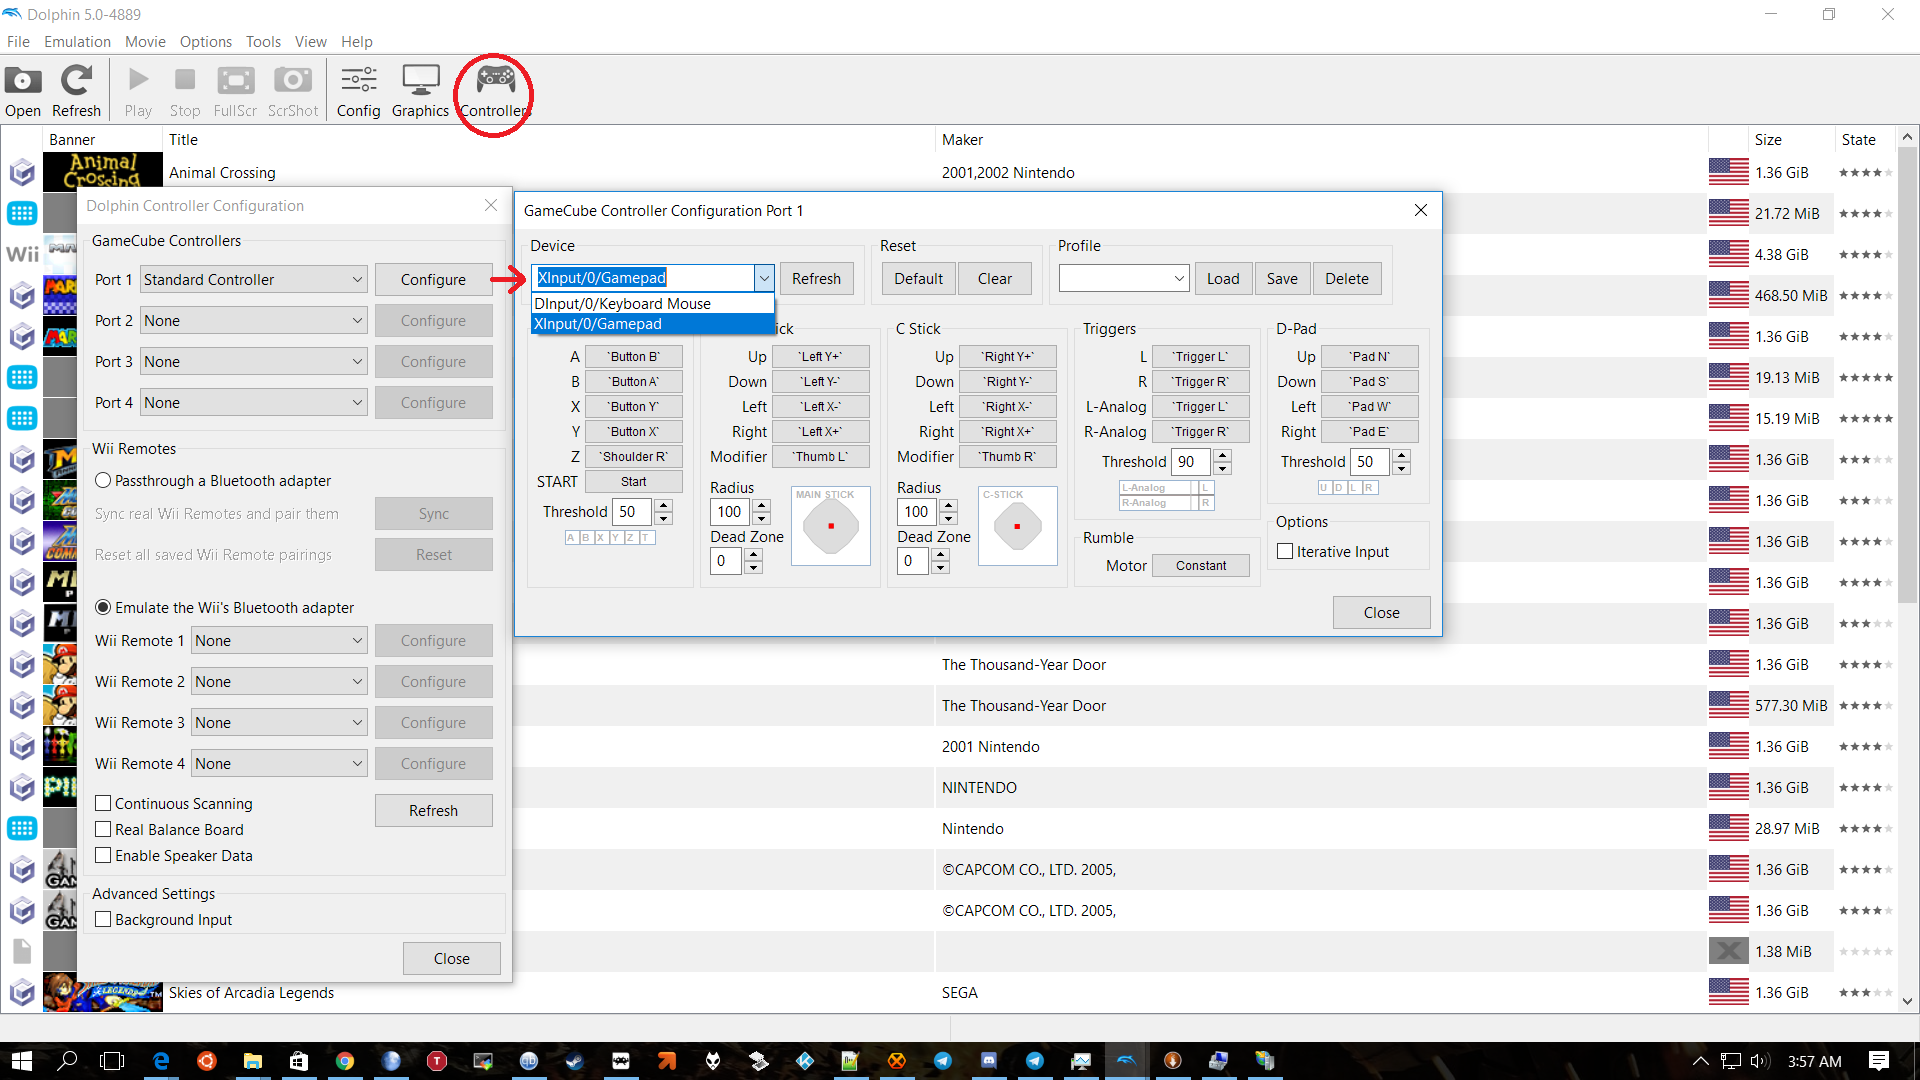
Dolphin’s controller setup is no more complicated than the non-motion control configuration for most emulators or games. If you need motion controls there are multiple ways to connect and configure actual Wiimotes, but that is a complex topic in and of itself that wont be included in this tutorial. It is very easy to get most USB controllers to work as both Gamecube controllers and Wii Classic/Pro controllers.
Under GameCube Controllers you should set Port 1 to “Standard Controller” in most cases. If you select the drop down menu you can see your other options and it should be self explanatory when you might want to use them. A Standard Controller setup should function like a normal GameCube controller and like a Wii Classic controller. Configure brings up another menu to let you configure the specifics of that controller.
Any x-input or d-input USB controller should, in theory, appear in the menu for “Device” on this screen. If not try hitting refresh until it appears. If it never appears something bigger and probably outside of the emulator is broken. After that just bind each button on the controller to the corresponding Gamecube controller button.
Back on the first screen you have nearly the same options for Wii Remotes, although worded differently. To set up a “normal” controller (not an authentic Wii Remote) you can select the ticker labeled “Emulate the Wii’s Bluetooth adapter.” Then you can set Wii Remote 1 to “Emulated Wii Remote” in the same way you set Port 1 to “Standard Controller” for GameCube Controllers before. If you hit “configure” you’ll get a similar page to select which device will act as your wiimote and the options to bind the buttons. Here though you also have a tab labelled “Motion Controls and IR.” You can bind normal button presses or other kinds of input to the Wii’s motion controls with these options. So, for instance, you could set a horizontal shake (the X option under “Shake”) to button A on your controller.
Conclusion
This tutorial has only scratched the surface of things that can be configured in current builds of Dolphin. However, it should have covered the most important and commonly used settings, especially those that will have a serious performance impact in most games. And it should have covered everything required to fully configure the emulator so it can run most games without major bugs.
Still, many games require more complex configuration. It’s not possible to make a general tutorial that would cover the huge number of minor tweaks certain games require. Some games will also work with this configuration but have very specific emulation bugs or feature bugs. Resident Evil 4 for example is fully playable, but using Savestates in Dolphin will break a feature of the Gamecube that game uses called “perfcounters” and cause the game to rapidly slow down to an unplayable speed. The only solution is to just use the normal saves in the game (to an emulated GC Memory Card) instead of savestates. Savestates will also not work between different versions of Dolphin, but emulated Memory Cards will.
Many parts of this tutorial may quickly become out of date with new developer releases, especially as ubershaders develop. I will try to keep things somewhat up to date and edit this tutorial often. In the future I will try to write guides on some more advanced configuration options and individual configurations for picky games.
Leave a Reply